Plumbing Leak Detection, Hidden Trouble of Pipe Corrosion
There are many reasons by a water pipe can be compromised, from corrosion to poor installation. No matter what the cause, if they aren’t repaired properly, they can end up putting a huge dent in your wallet.
Think you know everything about leaking pipes?
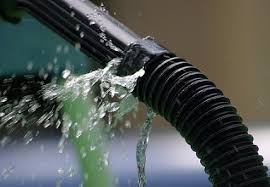
Whether it is a large gash in a pipe or a small pinhole drip, the water coming out disintegrates the materials the pipes are made from. So that small leak behind the wall you didn’t even know existed, will just get larger over time, leading to more damages and higher repair cost.
Hidden Trouble
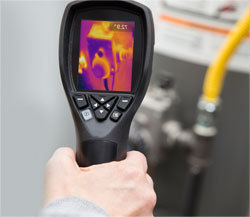
Most water leaks are hidden from view, whether under a concrete slab or behind the kitchen sink. Hidden water leaks can be detected in higher than normal water bill, a musty odor, unexplained mold, warm areas on the floor, blistering paint and peeling wallpaper.
Wasted Water
According to the Environmental Protection Agency, “The average family can waste 180 gallons per week, or 9,400 gallons of water annually, from household leaks. That’s equivalent to the amount of water needed to wash more than 300 loads of laundry.”
Tub and shower: Splash leaks
Splash leaks are simply water escaping past a shower curtain or a shower door. Plumbers tell us it’s the most common type of bathroom leak. Although it may sound minor, this leak causes major damage when water seeps into the subfloor where flooring meets the tub or shower. Before long the vinyl flooring or tiles begin to loosen. Even worse, the plywood subfloor delaminates and rots, requiring a huge, expensive tearout and replacement project.
Signs of trouble:
- Curling vinyl flooring or loose tiles next to the tub.
- Peeling paint or flaking, chalky-looking wood finish near the shower.
- Water stains on the ceiling or joists below.
- Mold spots on the wall or floor near the tub or shower.
- If you use a curtain, look for standing water on the floor after you shower.
How to find the source of a bathtub drain leaking:
- If you have a shower door, splash water all around the door and frame. Leaks around the frame may take five minutes or longer to show up.
- If the door has rubber gaskets or a rubber door sweep, check them for gaps.
- Also check for any gaps in the caulk where the shower or tub meets the flooring.
How to fix a leaking tub drain:
- Be sure to overlap sliding doors correctly when you close them. The inner door should be closest to the faucet.
- If you have a shower curtain rather than a door, make sure you close it completely when you shower, or add a splash guard.
- Seal a leaking frame by running a small bead of tub and caulk around the inside of the frame. Force the caulk into any gaps between the frame and the shower surround. Quickly wipe away all the excess caulk. When the caulk dries, test for leaks again.
- Replace any worn gaskets or door sweeps. Bring the old one to a home center or plumbing supply store and look for a matching replacement (be sure to get the correct size to fit).
- If the old caulk along the floor shows gaps, scrape it out and run a new bead.

Smart ways to find hidden water leaks without destroying your house
A water leak can result in serious problems, especially if it goes unnoticed. If you even suspect you have a leak somewhere, there are a few clues and ways you can detect it before it’s too late.
Check out these fives tips on how to detect water leaks so you can correct and stop the problem before it gets out of control.
- Monitor Your Water Meter
If you start to notice a higher water bill but you know that your water usage hasn’t increased, it’s a good sign that there’s a leak. Keep a close eye on your water meter to see if you detect any huge fluctuations. While you’re outside, make sure that there is no water source accidentally left turned on such as a garden hose. Turn all water off including inside water before you check the meter.
Next, take a closer look at the leak indicator and look for any movement. It depends on the type meter you have but for many, it’s a triangular-shaped dial. It may also look like a small silver wheel that spins when water flows through it. If either of these types of dials is turning after you’ve turned the water off, you likely have a leak. Another option is to take a reading and then wait an hour or two.
Take a second water meter reading to see if anything has changed. This is how to detect water leaks for most of your home. Just make sure you haven’t used any water during that hour to a two-hour window.
- Check Your Faucets
For many homeowners, the source of a water leak stems from the faucets. A worn rubber washer is often the culprit and can be found underneath the handle. You can easily replace the washer if you have the correct tools. You will need to turn the water off under the sink, or at the main cutoff valve.
Next, remove the faucet handles to access the gasket. Most home improvement or hardware stores sell replacement gaskets and the tools you need to fix this simple, common problem.
- How to Detect Water Leaks from Your Toilet
The toilet is another common culprit for water leaks, and it can often go unnoticed. A leaky toilet can waste several hundred gallons of water, which also means it can waste quite a bit of money.
Remove your tank lid and add a few drops of food coloring to the tank. Dye tabs are another easy alternative that can be purchased at many hardware stores.
Let the coloring saturate the water and wait approximately 30 minutes without flushing. If any color has come through the tank and into the toilet bowl, you likely have a leak.
Luckily, these types of leaks can often be resolved by replacing the flapper. The flapper has likely just worn out over time or become cracked which causes water to constantly flow from the tank into the bowl without you even noticing.
Another toilet-related red flag? If you need to jiggle the handle to keep your toilet from running, you likely have an issue with the flush bar and chain sticking.
You can fix this by adjusting the nut that secures this mechanism inside the tank. Or, you might need to replace the handle since it could be sticking.
- Perform a Visual Inspection
Leaks coming from plumbing inside the ceiling or walls can slowly go unnoticed until it’s too late. You can stop these types of leaks before they get out of control with a simple visual inspection.
Take a closer look at your walls and ceilings in every room. If you notice unusual staining or discoloration, you could have a hidden leak. A burst pipe is definitely something you want to fix as soon as possible.
Be on the lookout for mold or strange dips and bowing the ceiling or walls. Water damage will cause the material to stretch and eventually cave in.
This isn’t something you should stress about too much, but an occasional visual check can’t hurt. Often, people don’t know about a serious leak until their ceilings are completely caved in.
- Be Aware of Underground Water Leaks
Outdoor water leaks can get quite expensive to repair, so it’s important to know what to look for. If an area of your yard seems softer than others or you notice dark spots, this could be cause for concern.
If one particular area around your home seems to stay wet even after a dry spell, this is a red flag. You can also look closely near your driveway and street and see if you notice any unusual water flow.
Water flow doesn’t have to be a constant stream of flowing water. Even puddles that seem out of place may indicate that there’s a deep, underground leak.
If you suspect that you have an underground leak, call your local water or utility company as soon as possible. They have the tools and the know-how to further diagnose and fix the issue.
How to Connect a Water Softener Using Push Fittings
When your soap doesn’t lather and the toilet is staining, hard water could be the culprit. Hard water consists of large amounts of calcium, iron and magnesium minerals. Water softeners use an ionization process to capture these minerals and recharge the ions with sodium. Water softeners can be plumbed with copper, PEX or CPVC piping. Push-fit fittings create an opportunity for homeowners to forgo expensive plumbing equipment or soldering skills and install the system themselves.
Water Softener Installation
- Close the main water supply valve and open all faucets. Drain water from the home’s plumbing.
- Cut into the water supply line above the water softener using a pipe cutter. Allow enough space between the cuts for two push 90-degree elbow fittings to be installed.
- Deburr the end of the pipe with a deburring tool. Deburring prepares pipe ends and removes sharp protrusions which can cut the gaskets inside the push fittings, creating future leaks.
- Insert the push fitting 90-degree elbows into the water supply line and firmly push until completely seated.
- Measure the distance from the 90-degree elbows on the main water supply to the bypass valve on the water softener.
- Cut the pipe to the measured distance using a pipe cutter and deburr the ends.
- Insert the pipe ends into the 90-degree elbow push fittings until fully seated.
- Insert the other end of the pipes into the bypass valve on the water softener using the installation parts supplied by the manufacturer.
- Close open faucets, open the main water supply valve and check for leaks.
Tips
- Check code requirements in you area to insure proper and legal installation.
- Push fittings can be removed and reused using a special removal tool.
- Outside house bibs do not require soft water and should be plumbed upstream of the water softener.
- PEX stands for cross-linked polyethylene, while CPVC stands for chlorinated polyvinyl chloride