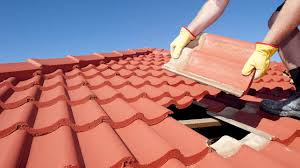
How to Repair a Loose Cement Tile Roof
Concrete or cement roof tiles are made with a mixture of cement, sand and water that is molded and dried in a kiln or tunnel. Pigments are added to the tiles to make them look like terracotta roofing tiles. Cement roof tiles are highly durable and crack resistant, with a marketed life expectancy of 40 years or more. They can come loose after extended exposure to strong winds, hail or earthquakes. Repair loose or cracked cement roof tiles by lifting up adjacent tiles and sliding new tiles under the wooden batten that holds the tiles to the roof.
- Put on heavy work gloves and safety glasses. Ascend a ladder to the work area on the roof, taking the necessary tools.
- Pry up the tile located above the loose tile with the flat end of a pry bar and the bend end facing down. Set the bend end of the pry bar gently down on the roof to prop the tile up. Do the same with the tile located directly to the left of the loose tile and the second pry bar.
- Pull off any broken tile parts. Tap and crack any parts of the broken tile that will not pull out with a hammer and remove them. Tilt and lift the back end of the loose tile up and off the wooden batten, also called a hanger strip, on the roof.
- Remove any loose nails from the loosened wooden batten with pliers. Replace the hanger strip if the wood is damaged or rotten. Nail the loose hanger strip onto the roofing felt with three even spaced roofing nails.
- Slide the top horizontal ridge of the cement tile under the propped-up tile above and over the top edge of the wooden batten on the roof so that the top ridge on the cement tile rests on top of the wooden batten. Slide the left edge of the cement tile under the propped-up cement tile to the left.
- Slide the pry bar out slowly from under the left tile and then slide the second pry bar out from under the top tile to finish installing the cement tile.
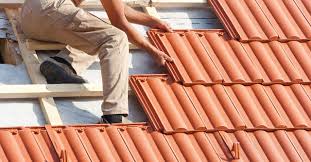
How To Repair A Tile Roof
Tile roofing is durable and adds great curb appeal to your home. All roofing will need some maintenance and repairs at some point. The following steps show you how to repair a tile roof. Should you not have the tools or time our team is always ready to help you repair your tile roof anywhere in the Phoenix Valley.
Step 1: Identify The Cause
Clay tiles may leak because of several reasons. While some issues will go beyond your roof and will be related to other things to do with roofing or the installation methods, some of the common issues with clay tiles are:
- Broken tiles
- Cracked tiles
- Collection of debris on the roof valley
- Worn out or defective waterproof membrane
In order to fix the leak, you will have to fix the issue that applies to you. Keep in mind that the clay roof tiles will break easily under pressure, so be sure to be careful whenever you are walking on your roof to find the cause of the leak.
Step 2: Fixing the Membrane
If the issue is in the waterproof membrane, then you will have to remove the existing tiles and replace the membrane with a new one. Then you will have to retile your roof. You may need the help of a professional for the removal and re-tiling.
Step 3. Removing the Debris
The roof valleys, especially closed ones will collect a lot of debris. This can cause leaks. To remove the debris, so there is no more leaking, you will have to remove the tiles from the area, then clean the area out, and lastly reinstall the tiles. You may consider wanting to covertyour roof valleys to be open to help to avoid any collection of debris within the future.
Step 4. Fixing cracks
If you happen to notice any fine cracks within the tiles, then you may repair them by applying RT-600 on the cracked tiles and then allow it to spread on the whole tile and let it dry.
Step 5. Fixing broken tiles
Tiles that have large cracks or are broken will need to be replaced in order to fix the leak. You will need to remove the damaged tiles using a pry bar. Use a hammer to help with the removal, but be careful to make sure that you will not damage the good tiles. If the roof is old, then the chances are that the tiles have been fixed using mortar. If this is the case, place the new tiles and use mortar to seal them in place.
Water-Testing for Roof Leaks
If you can’t find the cause of a leak from the attic or by visual inspection on the roof surface, wait for dry weather and ask a friend to help you do a water test. To do this, one person goes onto the roof with a garden hose; the other person goes inside the attic with a bucket and a strong light.
The person in the attic watches carefully while the one on the roof floods the roof with the hose, starting at the bottom (the eaves) and slowly working uproof until water from the leak appears in the attic. Once the leak is found, push a nail up through the hole to mark its location for rooftop repair. Mark the surface of the roof with chalk, if necessary.
Remove Damaged Slate Tile
The proper way to remove a roof slate tile utilizing a slate ripper. Jurin Roofing Services, Inc.
When slate tiles are damaged there usually are remnants of the tile left behind including nails. As a result, the second step in replacing a missing or damaged slate tile is to remove those remnants. This includes the nails used to attach the slate. This must be completed prior to the installation of the new slate tile.
Insert the top end of the slate ripping tool under the bottom edge of the slate tile or into the location where the tile is missing. You will notice that the slate ripper has a hook on either side of the top of the flat end of the ripper. The hooks are used to catch and cut the nails. As you catch the nail with the hooks, use your hammer to hit the handle of the slate ripper to drive the hook down against the nail. This will either cut the nail, or it will rip the nail out. Afterward, use the slate ripper to lift up on the slate and slide the slate out from its position.
What Causes Leaks at Valleys
Installing top flashing offers numerous advantages compared to other types of flashing available on the market, such as aluminum, lead, steel, or copper. Top flashing will effectively protect your tile roof from leaks in addition to being environmentally friendly and quick, hassle-free installation. Top flashing works well on virtually all flashing applications, offering durability and weather resistance.
How to Fix Leaky Roof Flashing
Most roofers will simply rely on sealants to waterproof difficult transitions; such as walls, plumbing stacks, or valley returns. As a result, sealants dry out and crack after a few years. So, while you believe your roof is performing well, the roof is slowly leaking with each rain causing havoc. Even when most roofers repair leaks, they again rely on sealants as waterproofing. In just a few years, the same leak is back.
Installing proper transition flashings using metal or flexible metal in these troublesome and high water volume areas is the correct way to fix a leaking roof. Using long-lasting materials ensures they will not break down from the exposure to sun or excess water flow.
Additionally, you should ensure your roof is inspected and/or maintained regularly to help it last up to twice as long. The most common areas to install flashing are around skylights, ridges, valleys, chimneys, and roof penetrations. Typically, flashing is the last line of defense before water damage.